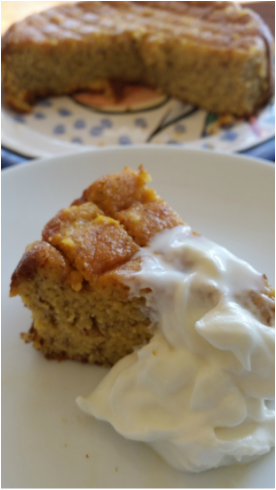
 This cake is so delicious and as elegant as it is rustic, but just so simple to make. Yes there is a little time involved from the first step in making this cake until it is ready to eat, but that's not necessarily a bad thing and it doesn't necessarily mean it will take a lot of your time at all. Let me explain... At 7.45am this morning I realised the builders were on their way to our house (we're renovating) and they would be expecting something delicious for smoko. I had to leave for work by 9.30 and I was still in my bathrobe and yet to have a shower!! Normally I probably would have whipped up a batch of blueberry muffins but on a quick check in the pantry (for the buckwheat flour) and the freezer (for the berry's) I was missing crucial ingredients. And besides, they had muffins the other day and I wanted to change it up! What I did have was an orange, almond meal, eggs, baking powder and Brown Rice Malt Syrup (Fructose free and about 50% as sweet as regular sugar) So this is how my morning went... 7.50am: 1. Switched on oven to preheat to 175 degrees 2. Washed 1 large organic orange and put it in a pot of water to 3/4 cover it, and whilst waiting for it to come to the boil I greased an 18cm round cake tin and then lined it with baking paper. By 7.56am the orange pot was boiling, so I put on the lid, turned down to a medium boil and set the timer to cook the orange for 30 minutes. 3. Whilst orange was cooking I had a relaxing shower, got dressed, made the bed and fed the cat. 4. When my trusty timer alerted me my time was up I returned to the kitchen and checked the orange was soft then removed it from the water and set it on my chopping board. I gently cut it into 1/8ths and left it to cool a minute while I got out the food processor and all other 4 ingredients! 5. I placed the orange in the food processor and blitzed it until it was pureed but not perfectly smooth (about 1/2 a minute) 6. I added 3 medium sized eggs and 1/2 cup Brown Rice Malt Syrup and blitzed it again for a couple of minutes until the mixture was thick and creamy. 7. Lastly I added 1 1/2 cups of ground almonds and 1 scant teaspoon of Baking powder and pulsed the food processor until the almonds were just mixed in. 8. Into the prepared tin and into the preheated oven the cake mix went, timer set for 45 minutes, and off I went to gather all my things together to take to the office, load the car, clean up the kitchen and chat to the builders. At 9.20am my buddy the timer hailed me back to the kitchen and she was right, the skewer came out clean and my cake was light gold and perfectly cooked. Onto the cooling rack and with the baking paper peeled off the cake looked delicious! The men stopped for smoko early due to the rain so I was able to grab a photo (above) before I left. Please note: this cake is exceptionally divine with my new favourite thing - Coconut yoghurt! mmm mmm
1 Comment
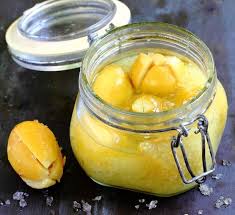
My mind is on lemons at the moment as I have just written an article on them for the winter edition of Go Gardening Magazine and I can hardly wait for this seasons crop of lemons to fully ripen so I can make a new batch of preserved lemons! Once you discover how simple they are to make and use, and how delicious they taste, you will never go back to life without them! I just love how exceptionally good so many traditionally preserved foods are. Our ancestors preserved out of necessity to keep the nutritional healthfulness and flavours of fresh foods available all year round but what happened by default was they created amazing diverse and different flavours that are often very different to the fresh food, but in the case of preserved lemons, absolutely divine! I don't recommend trying salt preserved lemons straight out of the jar, but I do recommend that they be added to any dish you desire to create a deep lemony rich undertone. Use just about anywhere a savoury dish calls for fresh lemon To make your own preserved lemons is so easy. You will need:
3 Lemons 4. 1 medium sized bowl How to do it:
Wash and dry your lemons and remove any stems. With the stalk end of the lemon down and pointy end up slice each lemon into quarters, about ¾ of the way through , leaving the lemon fully intact at the stalk end. Working over the bowl, 1 lemon at a time, cram about 1 tablespoon of salt inside the cuts. Press each salted lemon down firmly as you place it into the jar, so a good quantity of salty juice is squeezed out around it. Repeat until the jar is almost full and hopefully the top lemons are covered in juice. If not, squeeze some extra lemon juice to cover before releasing any air bubbles, then seal. Leave the jar(s) out at room temperature, and out of direct sunlight for 3 - 4 weeks, upending them every few days to ensure even curing of the lemons. The lemons are ready when their peel is soft. Stored in the fridge once opened will ensure a jar of these culinary delights last a good year at least. |
AuthorMeryn Wakelin is a Naturopath, Medical Herbalist, Nutrition Consultant (and passionate cook of all good food) now operating consultations via phone, skype, zoom Archives
September 2017
Categories |
Heal Naturally

