|
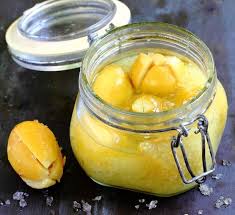
My mind is on lemons at the moment as I have just written an article on them for the winter edition of Go Gardening Magazine and I can hardly wait for this seasons crop of lemons to fully ripen so I can make a new batch of preserved lemons! Once you discover how simple they are to make and use, and how delicious they taste, you will never go back to life without them! I just love how exceptionally good so many traditionally preserved foods are. Our ancestors preserved out of necessity to keep the nutritional healthfulness and flavours of fresh foods available all year round but what happened by default was they created amazing diverse and different flavours that are often very different to the fresh food, but in the case of preserved lemons, absolutely divine! I don't recommend trying salt preserved lemons straight out of the jar, but I do recommend that they be added to any dish you desire to create a deep lemony rich undertone. Use just about anywhere a savoury dish calls for fresh lemon To make your own preserved lemons is so easy. You will need:
3 Lemons 4. 1 medium sized bowl How to do it:
Wash and dry your lemons and remove any stems. With the stalk end of the lemon down and pointy end up slice each lemon into quarters, about ¾ of the way through , leaving the lemon fully intact at the stalk end. Working over the bowl, 1 lemon at a time, cram about 1 tablespoon of salt inside the cuts. Press each salted lemon down firmly as you place it into the jar, so a good quantity of salty juice is squeezed out around it. Repeat until the jar is almost full and hopefully the top lemons are covered in juice. If not, squeeze some extra lemon juice to cover before releasing any air bubbles, then seal. Leave the jar(s) out at room temperature, and out of direct sunlight for 3 - 4 weeks, upending them every few days to ensure even curing of the lemons. The lemons are ready when their peel is soft. Stored in the fridge once opened will ensure a jar of these culinary delights last a good year at least.
1 Comment
12/1/2024 02:47:18 am
I wanted to express my gratitude for your insightful and engaging article. Your writing is clear and easy to follow, and I appreciated the way you presented your ideas in a thoughtful and organized manner. Your analysis was both thought-provoking and well-researched, and I enjoyed the real-life examples you used to illustrate your points. Your article has provided me with a fresh perspective on the subject matter and has inspired me to think more deeply about this topic.
Reply
Leave a Reply. |
AuthorMeryn Wakelin is a Naturopath, Medical Herbalist, Nutrition Consultant (and passionate cook of all good food) now operating consultations via phone, skype, zoom Archives
September 2017
Categories |
Heal Naturally

